Lync 2013 and Exchnage Online Hosted Voicemail setting resets after running DirSync

Got a colleague ringing me the other day with a strange issue:

He has Lync 2013 on premises with their voicemail hosted on Office 365 Exchange online, all configured and working wonderful.

However, for some users, the “HostedVoiceMail” attribute changes from “$true” to null. If he runs the “Set-csuser –identity Domain\Username –HostedVoiceMail $true” command again it will set it, but that will disappear as soon as DirSync runs again.

Did some investigation, and apparently – If it’s a shared mailbox, DirSync will switch it back from “$true” to “null”.

There is a workaround to fix this!

Go to your DirSync server, and at the following path: “%Program Files%\Microsoft Online Directory Sync\SYNCBUS\Synchronization Service\UIShell”, or ““%Program Files%\Windows Azure Active Directory Sync\SYNCBUS\Synchronization Service\UIShell” if you’re using Azure, you will find “miisclient.exe”:

miisclient.exe location

Open “miisclient.exe” and click the “Management Agents” tab:

Management Agents tab

Right-click “Source AD” and choose “Properties”:

SourceAD Properties

In the new window, choose “Configure Attribute Flow”, and expand “Object Type: user”:

Object Type: User Expanded2

Under “Object Type: user” click “msExchUCVoiceMailSettings” once. At the Build Attribute Flow window below, uncheck the “Allow Nulls” box:

Allow Nulls

Click OK, and close the MIIS client.

Re-enable the user for hosted voicemail, then resync. The user’s HostedVoiceMail setting will remain unchanged.

Lync 2013 Monitoring Server errors…

When you’re trying to view different reports in Lync Server 2013 monitoring, you might get the following error:

WebPage Error

“Report processing stopped because too many rows in summary tables are missing in the call detail recording (CDR) database. To resolve this issue, run dbo.RtcGenerateSummaryTables on the LcsCDR database.”

Additional parameters might appear instead of “dbo.RtcGenerateSummaryTables”, depending on the report you wish to view.

To fix this problem, start SQL Management Studio on your SQL server and choose the Lync Monitoring instance:

SQL Connection

Once connected, expand “Databases”->”LcsCDR”->”Programmability”:

Programmability

In “Programmability”, expand “Stored Procedures”:

Stored Procedures

And scroll down until you find the procedure mentioned in the error:

Generate Summary

Right-click the procedure and choose “Execute Stored Procedure”:

Execute

A new “Execute Procedure” window will open, Press “OK”:

Execute Screen

A script will run and will (hopefully) return a ‘0’ value, meaning everything went ok:

Script ran

That’s it! Return to your reports webpage and refresh:

Reports OK

Good Luck!

How to enable and configure Lync Server 2013 Group Call Pick-up

Lync Server 2013 CU1 brought great news with it: Finally, Lync users can now pick-up calls on behalf of  other users, when these are either away from their desk or in a call.

The configuration is done mostly (Forget it, entirely) by PowerShell and Command prompt.

To begin, you’ll need two major components:

  • The Lync Server 2013 CU1 installed on your servers. (Download)
  • The Microsoft Lync Server 2013 Resource Kit Tools. (Download)

Let’s start with the simple stuff:

Call pick-ups uses the same mechanism as Call parks to enable other users to fetch the call. So we’ll have to create a “Call Park Orbit”. The great advantage here is that we don’t have to use actual extensions, and anyway users are used to dial weird combinations like “#1250” or “*001” to fetch calls.

We now can assign numbers beginning with “#” or “*”, as long as we have at least three digits to follow, e.g: “#100”, or “*555”.

To create a new Call pick-up orbit, run the following command from Lync 2013 Management Shell:

New-CsCallParkOrbit -Identity "<Give it a name>" -Type GroupPickup -NumberRangeStart "#100" -NumberRangeEnd "#110" -CallParkService "<FEPool.doamin.local>"

Note you can assign any numbers you want to “NumberRangeStart” and “NumberRangeEnd“.

It should be something like this:

New-CsCallParkOrbit

If you did it right you should see event ID 31054 in the Lync Server event viewer:

Event 31054

Now the fun begins:

The application we use to configure the Call Pick-up can be found in the Lync Server 2013 Resource Kit. It’s called “SEFAUtil.exe” (Secondary Extension Feature Activation) and has to be run as a Trusted Application. This is where things get a little messy – We cannot use our Front-End severs for that (You wouldn’t want to configure your FE server as a Trusted Pool, nor it is supported by Microsoft), so you’ll have to use another server for that.

To configure the trusted application pool, run the following command from one of your Front-End servers:

New-CsTrustedApplicationPool -Identity "<Chosen Servers' Name>" -Registrar "<FEPool.doamin.local>" -Site "<Your site's name>"

The server will ask you to run “Enable-CsTopology“. Hang on with that…

Within the trusted application pool, you have to configure the trusted application. The name of the application MUST be “SEFAUtil”, as the command shows:

New-CsTrustedApplication –ApplicationId "sefautil" –TrustedApplicationPoolFqdn "<The server from the previous stage>" -Port xxxx

You can use any port you’d like. (Try not to use 25, 80, 443, etc…)

Now, run “Enable-CsTopology” and wait for the replication to occur.

Now – we’re ready to assign users with the new feature:

On the server that you have designated as the Trusted application pool, install the Lync Server 2013 Resource Kit.

From an elevated Command prompt or PowerShell, go to “C:\Program Files\Microsoft Lync Server 2013\ResKit“.

First: let’s test SEFAutil.exe. Gladly, it works in a very simple way: If it works – It will give you an output. If it’s not working – You’ll get a blank new line… That’s all there is to it. So to test, run the following command:

sefautil.exe /server:<Your Registrar> <user's SIP address>

To be clear: let’s say your user’s sip address is “Donald@Duck.com” and he’s located on registrar “Dazy.duck.local”, your command should be as follows:

sefautil.exe /server:Dazy.duck.local  Donald@Duck.com

Always use the user’s sip address, not their UPN.

If you typed the command correctly and the application is trusted, you’ll get a reply from the server looking like this:

PS C:\Program Files\Microsoft Lync Server 2013\ResKit> .\SEFAUtil.exe /server:Dazy.duck.local Donald@Duck.com
User Aor: sip:Donald@Duck.com
Display Name: Donald Duck
UM Enabled: True
Simulring enabled: False
User Ring time: 00:00:20
Call Forward No Answer to: voicemail
PS C:\Program Files\Microsoft Lync Server 2013\ResKit>

If you got no output – Check your trusted apps or typing.

Now: Let’s say you want to enable all users to fetch calls directed to the user “Donald@Duck.com”. Just use the following command:

SEFAUtil.exe /enablegrouppickup:"#110" /server:Dazy.duck.local Donald@Duck.com

Your output’s last line should say: Group Pickup Orbit: sip:#110;phone-context=user-default@Duck.com;user=phone

Now, try calling this user, and from another phone, dial #110. The call will be redirected and automatically answered by you.

You’re good to go!

Lync Server 2013 WAC (Office Web Apps Server) – Part 2: Publishing

In part 1 of this post, we learned how to install and configure the Lync Server 2013 WAC Server.

In this part, we’ll publish it to enable external users access to our conference resources.

Add External Access url:

In part 1, we used the following command:

New-OfficeWebAppsFarm -InternalURL “https://LyncWAC.YourDomain.Local” –CertificateName “My WAC Server”

For external access, use the same command, but add -ExternalURL “<WAC server external DQDN>”. So if you want to run is together, the command would be:

New-OfficeWebAppsFarm -InternalURL “https://LyncWAC.YourDomain.Local” -ExternalURL "https://WACsrv.domain.com" –CertificateName “My WAC Server”

That’s all the configuration needed on the Lync side.

Next step is to configure a publishing rule in TMG 2010. Unfortunately, you cannot use your External web url, since Lync traffic is bridged to port TCP 4443, and Office Web Apps Server works HTTPS, meaning TCP 443.#

Update:

Since TMG is end of life, You can now use IIS ARR to publish Lync Server 2013.

Refer to this post if you want to use IIS ARR.

Publish your server with Forefront TMG 2010:

Form your TMG cosnsole, select “New Web Publishing Rule”. Give your rule a name and click “Next”:

In the “select Rule Action window, choose “Allow” and click next:

In the “Publishing Type” windows choose “Publish a single Web site or load balancer”:

Then choose “Use SSL”:

In the next window, enter you Internal site name – That’s the one entered earlier in the command. If your TMG cannot resolve this name to an IP, you might enter it it in the field below:

In the Internal Publishing Details window, Enter /* in the path field, and remember to check the “Forward the original host header…” checkbox:

In “Public Name Details” enter the external FQDN of your WAC server. This is the name you entered earlier in the -ExternalURL command:

In the “Select Web Listener” window select “New”:

Name your listener and click next:

Choose “Require SSL” in the Client Connection Security window:

Choose your listener IP:

Choose your listener’s certificate:

(Must contain you external FQDN)

In the “Authentication Settings” window select “No Authentication”:

Click “Next” on the SSO settings page, review your listener’s settings and click Finish:

The new listener is now selected for your rule:

In the next window, choose “No delegation, but client may authenticate directly”:

Leave the user sets with “All Users”:

In the last window, review your settings and click Finish:

Locate your rule in the TMG console and right click to edit it:

Navigate to the “Traffic” tab, click “Filtering” and “Configure HTTP”:

Uncheck the “Verify normalization” box and click OK:

Verify_Normalization

Apply the changes to your Forefront TMG 2010 Server.

To test your WAC publishing, open a web browser and type: https://<ExternalFQDN.Domain.Com/hosting/discovery

You should get a XML output similat to this:

<?xml version="1.0" encoding="UTF-8"?>
-<wopi-discovery>-<net-zone name="internal-https">-<app name="Excel" checkLicense="true" favIconUrl="https://lyncwac.mydomain.local/x/_layouts/images/FavIcon_Excel.ico"><action name="view" urlsrc="https://lyncwac.mydomain.local/x/_layouts/xlviewerinternal.aspx?<ui=UI_LLCC&><rs=DC_LLCC&>" default="true" ext="ods"/><action name="view" urlsrc="https://lyncwac.mydomain.local/x/_layouts/xlviewerinternal.aspx?<ui=UI_LLCC&><rs=DC_LLCC&>" default="true" ext="xls"/><action name="view" urlsrc="https://lyncwac.mydomain.local/x/_layouts/xlviewerinternal.aspx?<ui=UI_LLCC&><rs=DC_LLCC&>" default="true" ext="xlsb"/><action name="view" urlsrc="https://lyncwac.mydomain.local/x/_layouts/xlviewerinternal.aspx?<ui=UI_LLCC&><rs=DC_LLCC&>" default="true" ext="xlsm"/><action name="view" urlsrc="https://lyncwac.mydomain.local/x/_layouts/xlviewerinternal.aspx?<ui=UI_LLCC&><rs=DC_LLCC&>" default="true" ext="xlsx"/><action name="edit" urlsrc="https://lyncwac.mydomain.local/x/_layouts/xlviewerinternal.aspx?edit=1&<ui=UI_LLCC&><rs=DC_LLCC&>" ext="ods" requires="update"/><action name="edit" urlsrc="https://lyncwac.mydomain.local/x/_layouts/xlviewerinternal.aspx?edit=1&<ui=UI_LLCC&><rs=DC_LLCC&>" ext="xlsb" requires="update"/><action name="edit" urlsrc="https://lyncwac.mydomain.local/x/_layouts/xlviewerinternal.aspx?edit=1&<ui=UI_LLCC&><rs=DC_LLCC&>" ext="xlsm" requires="update"/><action name="edit" urlsrc="https://lyncwac.mydomain.local/x/_layouts/xlviewerinternal.aspx?edit=1&<ui=UI_LLCC&><rs=DC_LLCC&>" ext="xlsx" requires="update"/><action name="editnew" urlsrc="https://lyncwac.mydomain.local/x/_layouts/xlviewerinternal.aspx?edit=1&<ui=UI_LLCC&><rs=DC_LLCC&>" ext="xlsx" requires="update"/><action name="interactivepreview" urlsrc="https://lyncwac.mydomain.local/x/_layouts/xlpreview.aspx?<ui=UI_LLCC&><rs=DC_LLCC&>" default="true" ext="xlsb"/><action name="interactivepreview" urlsrc="https://lyncwac.mydomain.local/x/_layouts/xlpreview.aspx?<ui=UI_LLCC&><rs=DC_LLCC&>" default="true" ext="xlsm"/><action name="interactivepreview" urlsrc="https://lyncwac.mydomain.local/x/_layouts/xlpreview.aspx?<ui=UI_LLCC&><rs=DC_LLCC&>" default="true" ext="xlsx"/><action name="mobileView" urlsrc="https://lyncwac.mydomain.local/x/_layouts/xlviewerinternal.aspx?<ui=UI_LLCC&><rs=DC_LLCC&>" ext="xls"/><action name="mobileView" urlsrc="https://lyncwac.mydomain.local/x/_layouts/xlviewerinternal.aspx?<ui=UI_LLCC&><rs=DC_LLCC&>" ext="xlsb"/><action name="mobileView" urlsrc="https://lyncwac.mydomain.local/x/_layouts/xlviewerinternal.aspx?<ui=UI_LLCC&><rs=DC_LLCC&>" ext="xlsm"/><action name="mobileView" urlsrc="https://lyncwac.mydomain.local/x/_layouts/xlviewerinternal.aspx?<ui=UI_LLCC&><rs=DC_LLCC&>" ext="xlsx"/><action name="embedview" urlsrc="https://lyncwac.mydomain.local/x/_layouts/xlembed.aspx?<ui=UI_LLCC&><rs=DC_LLCC&>" ext="xlsb"/><action name="embedview" urlsrc="https://lyncwac.mydomain.local/x/_layouts/xlembed.aspx?<ui=UI_LLCC&><rs=DC_LLCC&>" ext="xlsm"/><action name="embedview" urlsrc="https://lyncwac.mydomain.local/x/_layouts/xlembed.aspx?<ui=UI_LLCC&><rs=DC_LLCC&>" ext="xlsx"/><action name="formsubmit" urlsrc="https://lyncwac.mydomain.local/x/_layouts/xlform.aspx?<ui=UI_LLCC&><rs=DC_LLCC&>" ext="xlsb"/><action name="formsubmit" urlsrc="https://lyncwac.mydomain.local/x/_layouts/xlform.aspx?<ui=UI_LLCC&><rs=DC_LLCC&>" ext="xlsm"/><action name="formsubmit" urlsrc="https://lyncwac.mydomain.local/x/_layouts/xlform.aspx?<ui=UI_LLCC&><rs=DC_LLCC&>"

Note you will have two “net zones”: “internal-https” and “external-https”, each with the following applications offered:

  • Excel
  • OneNote
  • PowerPoint
  • Word

Your Lync 2013 WAC Server is ready.

Update Lync 2010 server from Evaluation to Production

I’m sure you had to install Lync 2010 at least once from the evaluation version (LSEVAL).

After a while (180 days, if you insist), you’ll have to ‘upgrade’ to the Production version. No re-installation needed, just follow these instructions:

1. Using Lync management shell, run the following command from the path of the Lync server installation:

msiexec.exe /fvomus server.msi EVALTOFULL=1 /qb

2. Using Lync management shell, run:

Enable-CsComputer

That’s it. Run this command on every Front-End Server, Directory Server and Edge Server you deployed using the evaluattion media.

Installing and configuring the Lync Server 2010 Mobility Update

It’s been out quite a while and it works just fine. Here’s how to enable users to communicate with Lync server from their mobile devices…

Prerequisites, clarifications and supported platforms:

  1. You must install Lync Server CU4 (KB2493736) for this to work. I usually download the LyncServerUpdateInstaller.exe file and let it automatically install all the needed updates. (If you have a more recent update – It’s already on there).
  2. You must download the “Microsoft Lync Server 2010 Mobility Service and Microsoft Lync Server 2010 Autodiscover Service” McxStandalone.msi. Don’t tempt to just run it now, we have a few things to do before that.
  3. Your Edge server is used only for push notifications, via Lync Online. You can run the CU4 installation tool there to update your server, but you must not install the mobility update on your Edge Srver.
  4. Your reverse proxy (ISA\TMG\UAG) or any other device you’re using for that matter is what we’ll use to publish this service. Infact, we use the meet.yourdomain.com publishing rule.
  5. If you feel like being useful, pre-publish a new external DNS A record called LyncDiscover.yourdomain.com and point it to the IP adsress of your ‘meet’ rule.
  6. I recommend using a trusted, valid, 3rd. party certificate on your reverse proxy server – it saves you loads of trouble.
  7. There are currently Lync mobile apps for WP7, Android, iPhones and iPads. I know not about any Symbian apps soon.
  8. There is something Blackberry-ish, Never saw it working.

So, Let’s get started.

Install the updates needed by launchig the Lync Server update installer from where you saved the file:

Once finished, the installer shows you you’re all good. It also saves the installation logs of every update in the folder from which you launced the installer.

After installing the updates, we need to update the system. We will use the following Lync Powershell command to do so. If you’re using a single standard server like me, your command should look like this:

Install-CsDatabase -Update -ConfiguredDatabases -SqlServerFqdn "FEServer.domain.local"

It should give an output lke this:

And end successfuly, like this:

Now we can start configuring the system for the mobility part. This will be done mostly by using the Lync Server Management Shell.

A prerequiste for this service to work is to have IIS Dynamic Compresion enabled. It can be quickly installed using two commands in Poweshell:

Import-Module Serv* (You can type the whole “ServerManager” command, but I always end up typing it twice so I’m getting lazy here…)

Add-WindowsFeature Web-Dyn-Compression

To configure the listening ports for the sevice, we will run one command twice, with two variables; the Primary listening port (internal) and the External listening port. These ports are documented in the Microsoft Lync Server 2010 Mobility Guide. To do that we will use the command “Set-CsWebServer” and provide our Front-end server’s FQDN and ports:

Set-CsWebServer -Identity FEServer.domain.local -McxSipPrimaryListeningPort 5086

Set-CsWebServer -Identity FEServer.domain.local -McxSipExternalListeningPort 5087

Then, we will update the topology using the followong command:

Enable-CsTopology

Now, remember I told you not to run the McxStandalone.msi file? here’s why: You should now take this file and paste it to the following location:

"C:\ProgramData\Microsoft\Lync Server\Deployment\cache\4.0.7577.0\setup" and just paste the file there:

After the file is there, you can either launch the Lync Server Deployment Wizard and choose “Setup or remove Lync server components”:

Or just go to the Lync Server deployment  folder (“C:\Program Files\Microsoft Lync Server 2010\Deployment”) and run the file “Bootstrapper.exe” This will install the update directly from the folder where we put it.

To view the log browse to your %tmp% folder and look for the latest Bootstrap-CsMachine log. If everything worked right, you will see a similar screen to this:

This tells you you have successfuly installed the service!

But we’re not done yet. If you used the Lync Server Deployment Wizard, don’t close it just yet. If not, this might be a good time to open it. We now need to generate a new certifiacte request and assign a new certifiacte for the Front-end server.

Why you’re asking? well, the answer will be revealed in the certificate wizard: If you look closely, you’ll see that two SANs were added automatically to the request: Lyncdiscover and LyncDiscoverInternal. They are added to every SIP domain configured in your topology:

You can now assign the certifiacte to your server and move on to the nest step:

 The service works now, you just need to configure the reverse proxy. But wait – what’s a mobile app without push notifications? Well… Setting that up is rather easy if you have Lync Federation enabled and is done by running four Powershell commands:

New-CsHostingProvider –Identity "LyncOnline" –Enabled $true –ProxyFqdn "sipfed.online.lync.com" –VerificationLevel UseSourceVerification

New-CsAllowedDomain –Identity push.lync.com –Comment “Mobile Push Notifications”

Set-CsPushNotificationConfiguration –EnableApplePushNotificationService $true –EnableMicrosoftPushNotificationService $true

Set-CsAccessEdgeConfiguration -AllowFederatedUsers $true

If you’ll check your Lync Server Control now, you’ll see you have a new provider:

And a new federation partner:

That’s it, configuration on the fron-end side is done.

Now, for your reverse proxy:

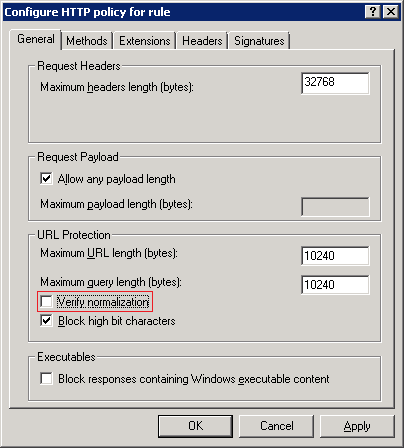
If you’re using TMG like I do, it’s rather easy. All you have to do is add “Lyncdiscover.youdomain.com” to the Public names and make sure you have c ertifiacte that corresponds to that name on your listener:

That’s about it.

Now, let’s test what  we just did:

I have a WP7 device and want to connect it to Lync. If everything was configured correctly, we will go through these steps:

I’ll launch the Lync on my phone, it will show me this screen:

I will now insert only my Lync sign-in address and  my password – this is all it takes for automatic sign in!

The app thinks for a while them launches the first screen:

It will ask you for your phone number – You can skip this step if you don’t have Enterprise Voice implemented:

Now it will ask you if you wish to enable push notifications:

And That’s it – you’re signed in:

How does push notifications look like?

Look at the top of the screenshot, this is what  you see when you get the message:

If you did not respond to the notification, the live tile will remind you you have one unread message in Lync:

Once you open the app, you will see the message:

That’s it, we’re good to go.

Manually configure Outlook for Office 365 Exchange Online

Update:

You might want to check the updated version of this post HERE.

***          ***          ***          ***

For many reasons, you might want to manually configure Outlook to work with Office 365.

Here are some obstacles you may encounter:

  • You don’t have the Office 365 Sign-in assistant available.
  • No Autodiscover record published.
  • You’re working on Wndows Server 2003 and can’t install Office 2010 hotfix kb2544027. (If you want you can install only the .msp file, it skips all the prerequisites)

I tried following Microsoft’s Article about how to do it, no luck.

Finally, after doing some digging, here’s how to do it:

Log on to Office 365 OWA at https://outlook.com/<your.domain>:

Office365OWA Login

Once logged on, go to “Help, About”:

Office 365 OWA Help About

In the new window, look for “Host Name”:

Office 365 Help Host Name

Copy the the host name and close this window.

Now we can create a new profile in Outlook with the following configuration;

Choose to manually configure server settings:

then choose “Microsoft Exchange or compatible service”:

in the Server Settings window in the Server field, paste the name of the Host Name you copied earlier.

Now, for this to work correctly, you need to add the word “mailbox” betwin the Host name and the rest of the FQDN. So if my Host Name is “sinprd0602.outlook.com”, my Server name here should be “sinprd0602.mailbox.outlook.com”. Do the same for the name you copied:

Don’t forget to enter your Office 365 email address at the “User Name” field, then click “More Settings” and go to the “Connection” tab. Check the “Connect to Microsft Exchange using HTTP” box and click “Exchange Proxy Settings…”:

In the next window, fill the following details:

Type the Host Name you copied earlier in the “Use this URL to connect to my proxy server for Exchange” field.

Check the “Only connect to proxy server that have this principal name in their certificate” box and type: msstd:outlook.com.

Make sure both checkboxes are marked for connecting using HTTP first, and make sure you set the authentication method to “Basic”:

Click “OK” twice, then click “Check name” and enter your password at the prompt. the server and user names should be underlined:

Click “Next” and “Finish” and open Outlook, enter your password if prompted. That’s it, You’re connected!

Create and enroll certificates for Certificate Based Authentication on mobile phones

The purpose of this step by step  article is to create user certificates with a validity period of 3 years instead of the default one year.

Since all users will visit the IT services desk to have the certificates installed on their mobile devices, we will use the “Enroll on behalf” option in ADCS 2008R2.

On my next article, we will see how to configure Forefront TMG 2010 to use Kerberos Constrained Delegation with Exchange Server 2010 SP1.

Note – not all steps are required in all organization. See what fits you best.

Logged on as the Domain Administrator, open the User certificate MMC Snap-in:

Right-click on the Personal certificate store, and choose “All tasks”, “Request new certificate”:

In the first window click ‘Next’:

Choose your enrollment policy:

In the certificate template screen choose “Enrollment Agent” and click “Enroll”:

This is what you should see:

The new certificate is in your personal certificate store and you can now enroll certificates on behalf of other users:

To assign this privilege to other users, right-click your personal certificate store, choose “All Tasks”, “Advanced Operations”, “Enroll On Behalf Of”:

Click “Next” on the first screen:

Choose your Enrollment policy:

Click “Browse” to choose the enrollment agent certificate you just created:

Choose your certificate and Click “OK”:

Click “Next”:

Choose the “Enrollment Agent” certificate template again, and click “Next”:

Click “Browse” to select the user you would like to enroll the certificate to:

Here I chose one user from the helpdesk staff:

It looks like this, now Click “enroll”:

And now you can choose whether to enroll another user or finish the operation:

Now you can see that the IT Helpdesk users 1 and 2 have also the ability to enroll certificates on behalf of users:

That’s done; let’s create the certificate template for the mobile devices:

Open your CA console, expand to “Certificate templates”, then right click it and choose “Manage”:

This will open the certificate templates snap-in. Scroll down to the User certificate template and choose “Duplicate Template”:

It will ask you which template would you like to create – I normally choose Windows Server 2008:

Once you press OK, the new certificate template is opened. Name your certificate template and change the certificate validity period. I think 3 years is more than enough:

Switch to the “Issuance Requirements” tab and change the following:

· Check the “This number of authorized signatures” box and type ‘1’ in the box.

· Make sure that the policy type required in the signature is “Application policy”.

· Change the Application policy to “Certificate Request Agent” from the drop down menu.

· Click OK to close the template.

This is just half way. You also need to start the registry editor and go to:

HKEY_LOCAL_MACHINE\SYSTEM\CurrentControlSet\services\CertSvc\Configuration\<Your CA Name>.

There, look for the value “ValidityPeriodUnits” Change it from 2 (default) to as high as you want. Note that you can only set the validity period on the template to as much as it’s set on the registry (i.e. even if you set the certificate template to 10 years and the registry is set to 3, you will only be able to extend the validity period to 3 years). This change does not affect predefined templates.

Now you can see the template in the templates list:

Go back to your CA mmc snap-in, and from “Certificate Templates”, choose “New”, “Certificate template to issue”:

Choose your new template and click OK:

You can see it under “Certificate Templates”:

Now – Let’s request a certificate on behalf of a user:

Right-click your personal certificate store, then choose “All Tasks”, “Advanced Operations”, “Enroll On Behalf Of”:

Click “Next” on the first screen:

Then, choose your Enrollment policy:

Click “Browse” to choose your enrollment agent certificate:

Choose your signing certificate and click “OK”: (Note you have more than one now)

Choose your new certificate and click “Next”:

Select the user you want to enroll the certificate to and click “Enroll”:

That’s it. Your user’s certificate is ready: