Skype for Business and Lync Servers certificate report

This is a cross-post with Guy Bachar’s blog, of a script we wrote back in August 2014 and that went through some technical (mostly Guy) and cosmetic (mostly yours truly) updates.

Report

This script will generate an HTML report of all Skype for Business \ Lync servers’ certificates, and you can even use it to send periodical emails.

As the new script supports contacting your Edge servers, there are some prereqs involved:

1. Enable Trusted Hosts on the Front-End server you’re running the script from:

Set-Item WSMan:\localhost\Client\TrustedHosts -Value “*” -Force

2. Enable HTTP Compatibility Listener on all Edge servers:

Set-Item WSMan:\localhost\Service\EnableCompatibilityHttpListener -Value True

The script is pretty straight forward, all you have to do is run it form a local folder on your FE server with elevated permissions.
However, this will only give you the FE’s certificates.
Guy was smart enough to create the following additions:

-EdgeCertificates and -OWASCertificates

You can run either or both, and they will give you information about your Office Web Apps Servers’ certificates (-OWASCertificates) and your Edge Servers’ certificates (-EdgeCertificates).
When using the -EdgeCertificates option, you’ll be prompted to enter your Edge Server’s credentials.

Command

Visit Guy’s post for further information.

The script can be downloaded here, and we’ll love to hear your feedback.

Office Web Apps Server no longer available for download

Quietly, The Office team announced last month that Office Web Apps Server will not be available for public download as of November 24. That’s less than one week…

According to Microsoft, Office Web Apps Server will be available for download only under volume licensing agreements.
Existing installations will not require a license.

So, before it’s too late – download your copy current copy of Office Web Apps Server here.
Don’t forget to also download its SP1 update.

Source

Lync 2013 and Windows 8.1 PowerPoint presesntation issue fixed

A couple of weeks back I wrote a post about PowerPoint content issues when using Lync 2013 on Windows 8.1 workstations.

Gladly, this issue is fixed now with the release of the Office Web Apps November 2013 update.

Remember you will need to remove your existing farm first, install the update and then reconfigure the Office Web Apps farm.

Lync Server 2013 WAC (Office Web Apps Server) – Part 2: Publishing

In part 1 of this post, we learned how to install and configure the Lync Server 2013 WAC Server.

In this part, we’ll publish it to enable external users access to our conference resources.

Add External Access url:

In part 1, we used the following command:

New-OfficeWebAppsFarm -InternalURL “https://LyncWAC.YourDomain.Local” –CertificateName “My WAC Server”

For external access, use the same command, but add -ExternalURL “<WAC server external DQDN>”. So if you want to run is together, the command would be:

New-OfficeWebAppsFarm -InternalURL “https://LyncWAC.YourDomain.Local” -ExternalURL "https://WACsrv.domain.com" –CertificateName “My WAC Server”

That’s all the configuration needed on the Lync side.

Next step is to configure a publishing rule in TMG 2010. Unfortunately, you cannot use your External web url, since Lync traffic is bridged to port TCP 4443, and Office Web Apps Server works HTTPS, meaning TCP 443.#

Update:

Since TMG is end of life, You can now use IIS ARR to publish Lync Server 2013.

Refer to this post if you want to use IIS ARR.

Publish your server with Forefront TMG 2010:

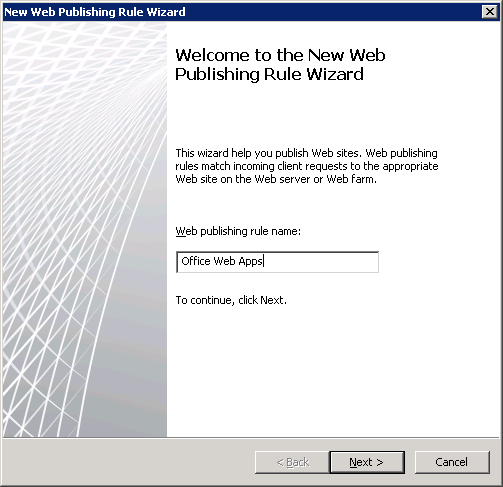
Form your TMG cosnsole, select “New Web Publishing Rule”. Give your rule a name and click “Next”:

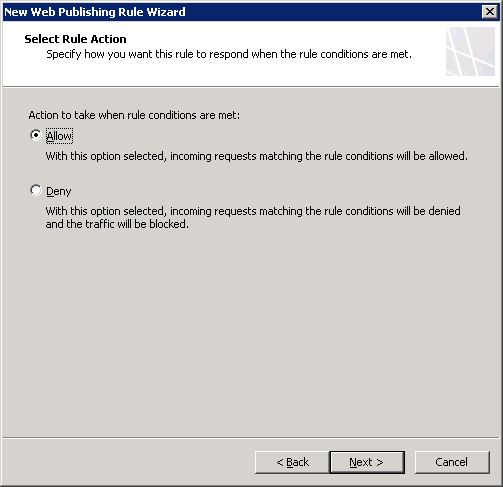
In the “select Rule Action window, choose “Allow” and click next:

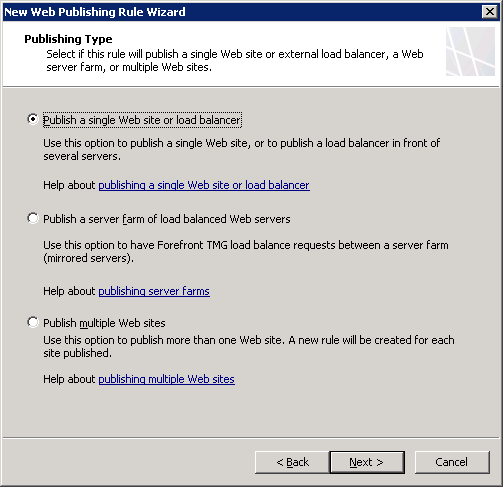
In the “Publishing Type” windows choose “Publish a single Web site or load balancer”:

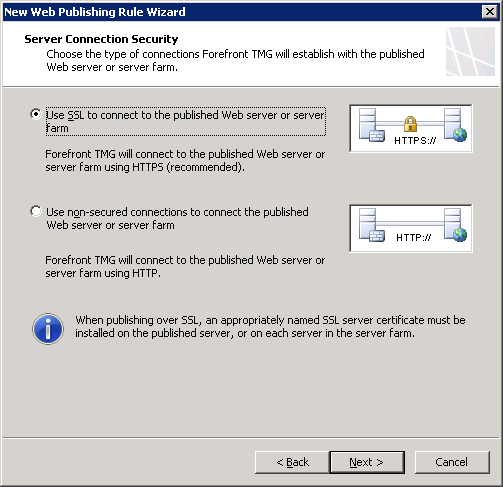
Then choose “Use SSL”:

In the next window, enter you Internal site name – That’s the one entered earlier in the command. If your TMG cannot resolve this name to an IP, you might enter it it in the field below:

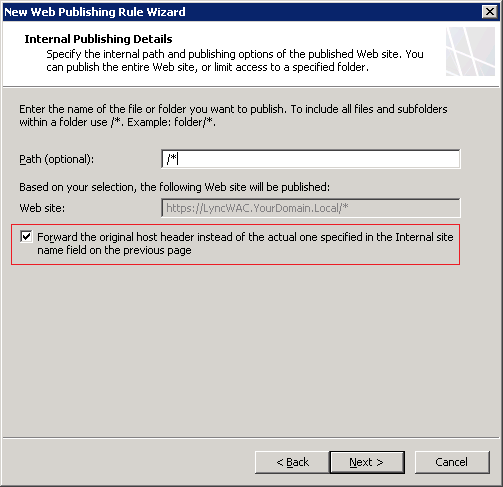
In the Internal Publishing Details window, Enter /* in the path field, and remember to check the “Forward the original host header…” checkbox:

In “Public Name Details” enter the external FQDN of your WAC server. This is the name you entered earlier in the -ExternalURL command:

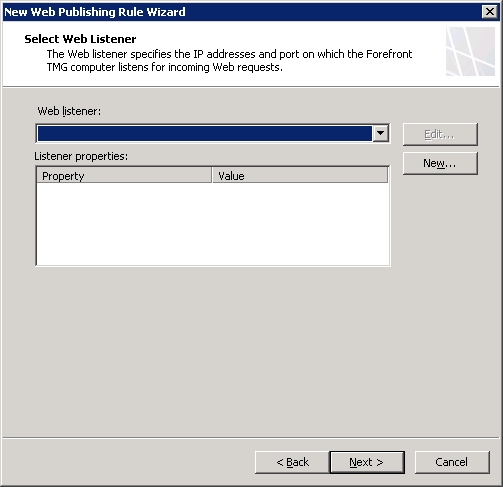
In the “Select Web Listener” window select “New”:

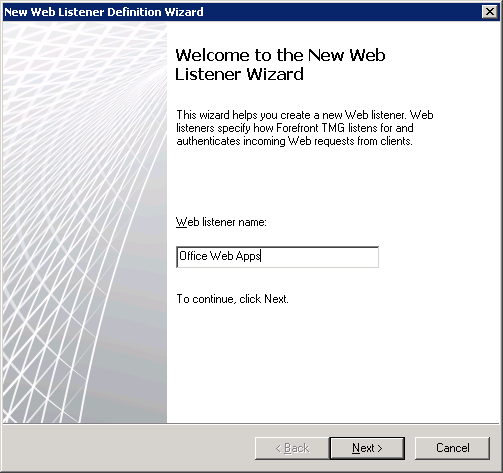
Name your listener and click next:

Choose “Require SSL” in the Client Connection Security window:

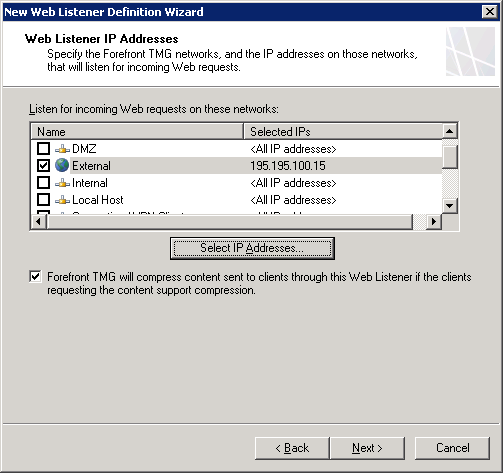
Choose your listener IP:

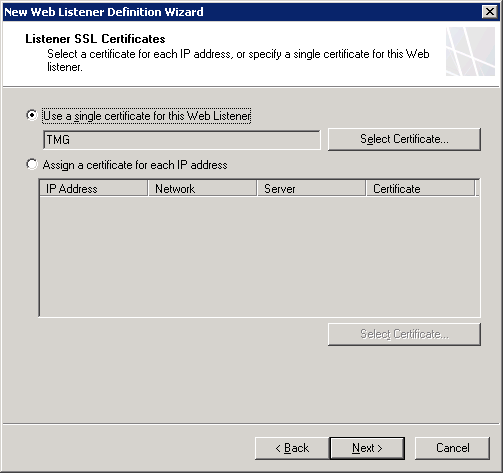
Choose your listener’s certificate:

(Must contain you external FQDN)

In the “Authentication Settings” window select “No Authentication”:

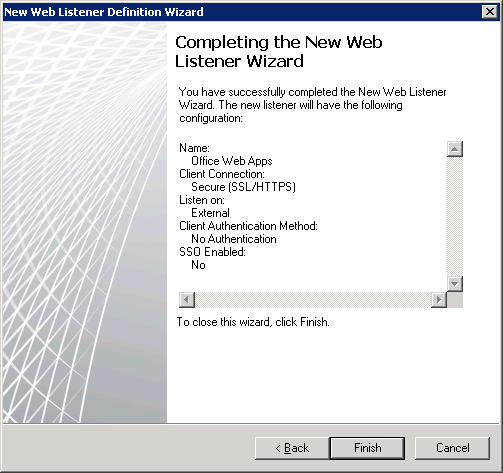
Click “Next” on the SSO settings page, review your listener’s settings and click Finish:

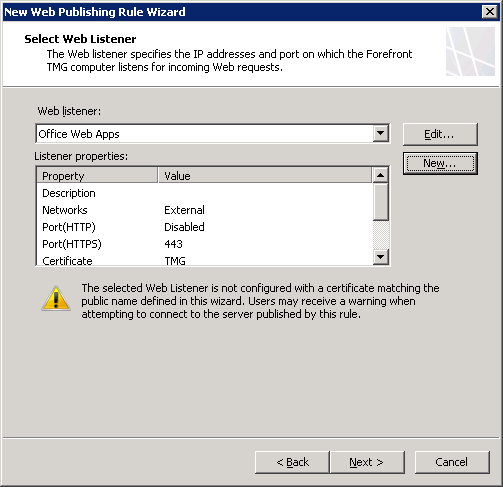
The new listener is now selected for your rule:

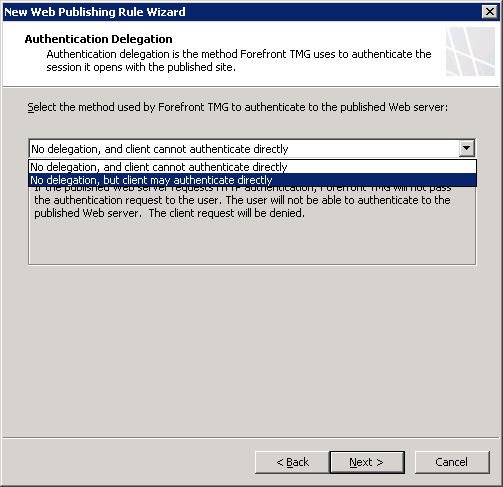
In the next window, choose “No delegation, but client may authenticate directly”:

Leave the user sets with “All Users”:

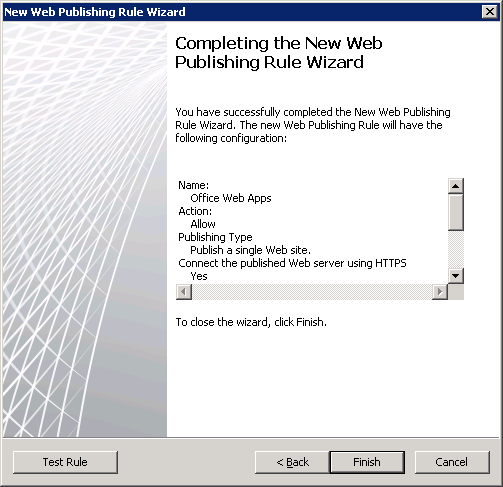
In the last window, review your settings and click Finish:

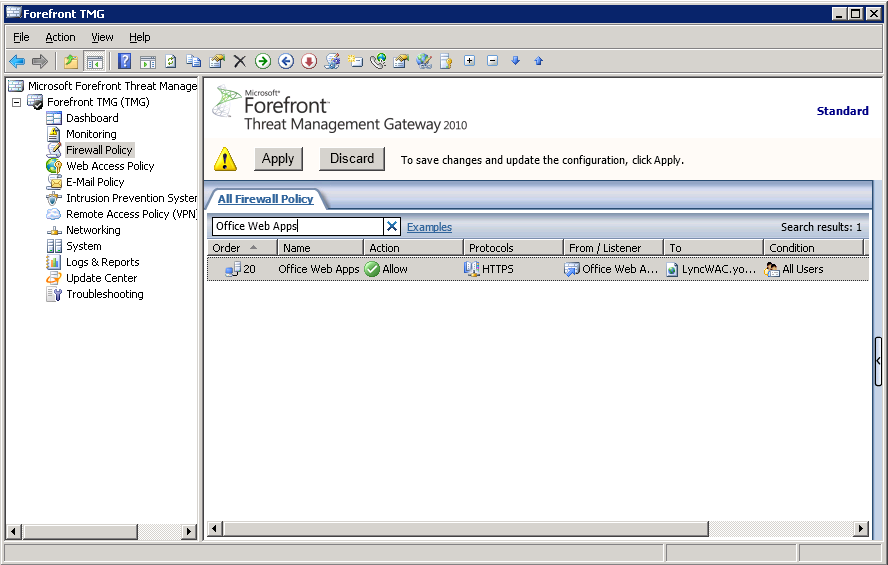
Locate your rule in the TMG console and right click to edit it:

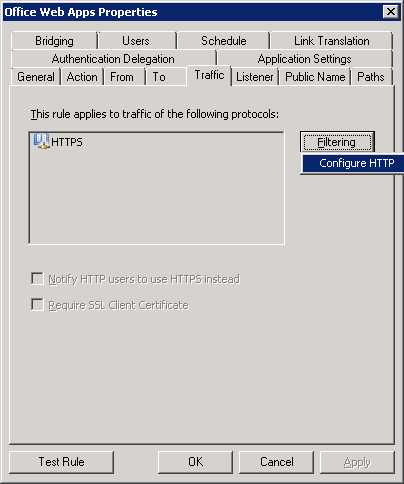
Navigate to the “Traffic” tab, click “Filtering” and “Configure HTTP”:

Uncheck the “Verify normalization” box and click OK:

Verify_Normalization

Apply the changes to your Forefront TMG 2010 Server.

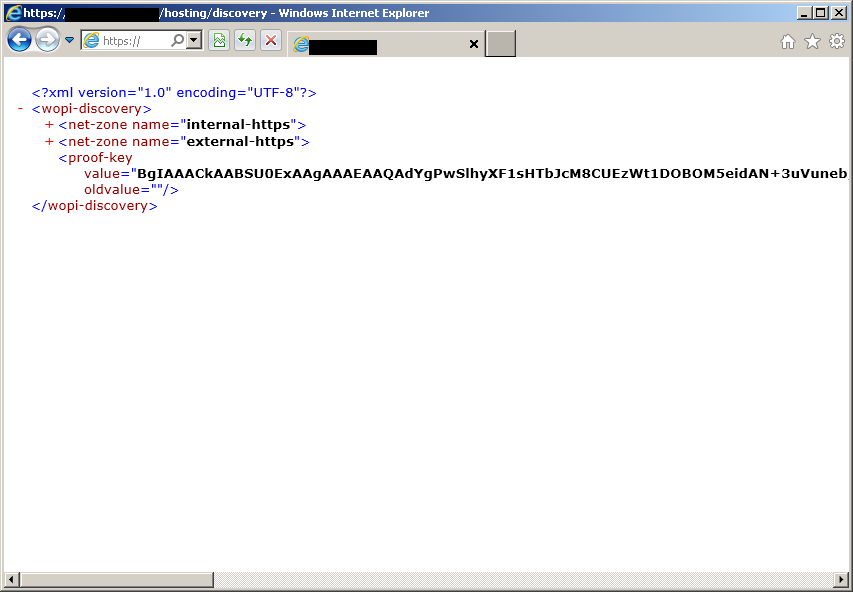
To test your WAC publishing, open a web browser and type: https://<ExternalFQDN.Domain.Com/hosting/discovery

You should get a XML output similat to this:

<?xml version="1.0" encoding="UTF-8"?>
-<wopi-discovery>-<net-zone name="internal-https">-<app name="Excel" checkLicense="true" favIconUrl="https://lyncwac.mydomain.local/x/_layouts/images/FavIcon_Excel.ico"><action name="view" urlsrc="https://lyncwac.mydomain.local/x/_layouts/xlviewerinternal.aspx?<ui=UI_LLCC&><rs=DC_LLCC&>" default="true" ext="ods"/><action name="view" urlsrc="https://lyncwac.mydomain.local/x/_layouts/xlviewerinternal.aspx?<ui=UI_LLCC&><rs=DC_LLCC&>" default="true" ext="xls"/><action name="view" urlsrc="https://lyncwac.mydomain.local/x/_layouts/xlviewerinternal.aspx?<ui=UI_LLCC&><rs=DC_LLCC&>" default="true" ext="xlsb"/><action name="view" urlsrc="https://lyncwac.mydomain.local/x/_layouts/xlviewerinternal.aspx?<ui=UI_LLCC&><rs=DC_LLCC&>" default="true" ext="xlsm"/><action name="view" urlsrc="https://lyncwac.mydomain.local/x/_layouts/xlviewerinternal.aspx?<ui=UI_LLCC&><rs=DC_LLCC&>" default="true" ext="xlsx"/><action name="edit" urlsrc="https://lyncwac.mydomain.local/x/_layouts/xlviewerinternal.aspx?edit=1&<ui=UI_LLCC&><rs=DC_LLCC&>" ext="ods" requires="update"/><action name="edit" urlsrc="https://lyncwac.mydomain.local/x/_layouts/xlviewerinternal.aspx?edit=1&<ui=UI_LLCC&><rs=DC_LLCC&>" ext="xlsb" requires="update"/><action name="edit" urlsrc="https://lyncwac.mydomain.local/x/_layouts/xlviewerinternal.aspx?edit=1&<ui=UI_LLCC&><rs=DC_LLCC&>" ext="xlsm" requires="update"/><action name="edit" urlsrc="https://lyncwac.mydomain.local/x/_layouts/xlviewerinternal.aspx?edit=1&<ui=UI_LLCC&><rs=DC_LLCC&>" ext="xlsx" requires="update"/><action name="editnew" urlsrc="https://lyncwac.mydomain.local/x/_layouts/xlviewerinternal.aspx?edit=1&<ui=UI_LLCC&><rs=DC_LLCC&>" ext="xlsx" requires="update"/><action name="interactivepreview" urlsrc="https://lyncwac.mydomain.local/x/_layouts/xlpreview.aspx?<ui=UI_LLCC&><rs=DC_LLCC&>" default="true" ext="xlsb"/><action name="interactivepreview" urlsrc="https://lyncwac.mydomain.local/x/_layouts/xlpreview.aspx?<ui=UI_LLCC&><rs=DC_LLCC&>" default="true" ext="xlsm"/><action name="interactivepreview" urlsrc="https://lyncwac.mydomain.local/x/_layouts/xlpreview.aspx?<ui=UI_LLCC&><rs=DC_LLCC&>" default="true" ext="xlsx"/><action name="mobileView" urlsrc="https://lyncwac.mydomain.local/x/_layouts/xlviewerinternal.aspx?<ui=UI_LLCC&><rs=DC_LLCC&>" ext="xls"/><action name="mobileView" urlsrc="https://lyncwac.mydomain.local/x/_layouts/xlviewerinternal.aspx?<ui=UI_LLCC&><rs=DC_LLCC&>" ext="xlsb"/><action name="mobileView" urlsrc="https://lyncwac.mydomain.local/x/_layouts/xlviewerinternal.aspx?<ui=UI_LLCC&><rs=DC_LLCC&>" ext="xlsm"/><action name="mobileView" urlsrc="https://lyncwac.mydomain.local/x/_layouts/xlviewerinternal.aspx?<ui=UI_LLCC&><rs=DC_LLCC&>" ext="xlsx"/><action name="embedview" urlsrc="https://lyncwac.mydomain.local/x/_layouts/xlembed.aspx?<ui=UI_LLCC&><rs=DC_LLCC&>" ext="xlsb"/><action name="embedview" urlsrc="https://lyncwac.mydomain.local/x/_layouts/xlembed.aspx?<ui=UI_LLCC&><rs=DC_LLCC&>" ext="xlsm"/><action name="embedview" urlsrc="https://lyncwac.mydomain.local/x/_layouts/xlembed.aspx?<ui=UI_LLCC&><rs=DC_LLCC&>" ext="xlsx"/><action name="formsubmit" urlsrc="https://lyncwac.mydomain.local/x/_layouts/xlform.aspx?<ui=UI_LLCC&><rs=DC_LLCC&>" ext="xlsb"/><action name="formsubmit" urlsrc="https://lyncwac.mydomain.local/x/_layouts/xlform.aspx?<ui=UI_LLCC&><rs=DC_LLCC&>" ext="xlsm"/><action name="formsubmit" urlsrc="https://lyncwac.mydomain.local/x/_layouts/xlform.aspx?<ui=UI_LLCC&><rs=DC_LLCC&>"

Note you will have two “net zones”: “internal-https” and “external-https”, each with the following applications offered:

  • Excel
  • OneNote
  • PowerPoint
  • Word

Your Lync 2013 WAC Server is ready.

Lync Server 2013 and Skype for Business Server 2015 – WAC (Office Web Apps Server) – Part 1: Installing and configuring

27.03.2013: Updated to the latest version of Office Web Apps Server.

Lync Server 2013 WAC is a new requirement in the Lync Server 2013 deployment. You’ll have to have this server is you want to be able to share PowerPoint presentations.

The installation and configuration of this server is quite easy,  let’s take a look:

Prerequisites:

First, download the Microsoft Office Web Apps Server from here and the update from here. While it downloads, we can configure the other prerequisites.

If you’re using Windows Server 2008R2, please download Microsoft’s .Net Framework 4.5, download Windows Management Framework 3.0, and download KB2592525, which will allow you to run the applications in a Server 2008R2 environment.

Install all of the above, Then, run this using an elevated PowerShell:

Import-Module ServerManager
Add-WindowsFeature Web-Server,Web-WebServer,Web-Common-Http,Web-Static-Content,Web-App-Dev,Web-Asp-Net,Web-Net-Ext,Web-ISAPI-Ext,Web-ISAPI-Filter,Web-Includes,Web-Security,Web-Windows-Auth,Web-Filtering,Web-Stat-Compression,Web-Dyn-Compression,Web-Mgmt-Console,Ink-Handwriting,IH-Ink-Support

Restart the server if you’re prompted to do so.

If you’re using Windows Server 2012, it’s even easier; Just run the following from an elevated  PowerShell (Server 2012 imports the relevant PS modules automatically, so you don’t have to use the “Import-Module” command) :

Add-WindowsFeature Web-Server,Web-Mgmt-Tools,Web-Mgmt-Console,Web-WebServer,Web-Common-Http,Web-Default-Doc,Web-Static-Content,Web-Performance,Web-Stat-Compression,Web-Dyn-Compression,Web-Security,Web-Filtering,Web-Windows-Auth,Web-App-Dev,Web-Net-Ext45,Web-Asp-Net45,Web-ISAPI-Ext,Web-ISAPI-Filter,Web-Includes,InkandHandwritingServices

Restart the server if you’re prompted to do so.

Install the Microsoft Office Web Apps Server:

For Server 2012, double-click the .img file and run “Setup.exe”.

For Server 2008R2, open the .img file with any software of your choice and run “Setup.exe”

Restart the server if you’re prompted to do so and install the update.

Create a certificate:

Like most Lync services, you’re required to assign a certificate to this service as well.

We’ll use the IIS Manager to do that:

Launch the IIS Manager and scroll down to “Server Certificates”:

In the “Server Certificates” window, click on “Create Domain Certificate” in the Action pane:

In the “Create Certificate” window, fill the details of your server and organization. Note that the “Common Name” must be in the “Server.Domain.Local” format:

In the next window, choose you CA, and give your certificate a friendly display name – We’ll use that name later:

When you click “Finish”, you’ll see you have a new certificate:

Configure the WAC Server:

From an elevated PowerShell, run the following command:

New-OfficeWebAppsFarm -InternalURL “https://LyncWAC.YourDomain.Local” –CertificateName “My WAC Server”

In -CertifiacteName, enter the friendly name you gave your certificate earlier.

The result should look like this:

To check that, open a web browser and go to https://LyncWAC.YourDomain.Local/hosting/discovery, you should get this result:

If you get an error, try fixing your .Net Framework 3.5 components with this command:

%systemroot%\Microsoft.NET\Framework64\v4.0.30319\aspnet_regiis.exe -iru,

Then, run iisreset /restart /noforce.

Your WAC Server is ready!

Add the Server to Lync Topology:

Open the Lync Server Topology Builder, expand “Shared Components”,right click “Office Web Apps Servers”, and choose “New Office Web Apps Server…”:

In the new window, type your server’s FQDN. the wizard will fill-in the discovery address:

Press OK, and the server is in your topology:

Associate your  Front-End pools with your Office Web Apps Server, publish the topology, and you’re done!

See how to publish your WAC server in Part 2 of this post