Lync 2013 Persistent Chat Service stops after 20 minutes

Followed by Event 53503, LS Persistent Chat Server, This might happen due to an issue with the Persistent Chat DB.

The work around is to export the Persistent Chat data from the Persistent Chat database to a file, run a clean installation the Persistent Chat database and then import the Persistent Chat data from the file to the Persistent Chat database.

Use the following commands:

  1. Export-CsPersistentChatData –DbInstance <YourPCInstance> –FileName PCExport.zip to export the data to file.
  2. Install-CsDatabase –DatabaseType PersistentChat –SqlServerFQDN <PCServer.Domain.local> –SqlInstanceName <YourPCInstance> –Clean to clean the Persistent Chat DB.
  3. Import-CsPersistentChatData –DbInstance <YourPCInstance> –FileName PCExport.zip to import the data.

Microsoft released this KB to resolve the above issue.

List all users and devices – Lync 2013

I recently published a post with a short script that creates an automated Excel file that lists all your Lync users. This file can be used in documentations and to find all your assigned phone numbers.

Getting some feedback from users and colleagues, I updated the script and it can now show all the users, common area phones, analog devices and Response Groups workflows in youe environment.

The Excel file is created with a separate tab for users, common are phones, analog devices and RGS workflows.

A built-in filter into every column will help you find the information you need based on registrar, analog gateway, username, etc.

Lync users

The file lists the following for each tab:

Lync users:

Display Name SIP Address Registrar Pool Enterprise Voice Line URI

Analog Devices:

Display Name SIP Address Registrar Pool Gateway Line URI

Common Are Phones:

Display Name SIP Address Registrar Pool Description Line URI

RGS Workflows:

Display Name SIP Address Line URI

Run the script from your client machine (NOT Your Lync servers), where you have Excel (At Least 2010) and PowerShell version 3.0 and above.

The script will ask you for your Lync Admin credentials and one of your Lync pools’ FQDN:

Remote PowerShell

It will then connect remotely to you server and start Excel. The script is designed to ignore certificate certificates warnings as you might be running this from a none domain-joined machine.

Download the script here.

List Lync Users – automated Excel file

(Have a look at the newer, smarter, prettier, fancier version of this script here.)

This script isn’t big news, but it’s very handy and easy to use.
It allows you to remotely connect to one of your pools and create an Excel sheet, populated with the following:

Display Name SIP Address Registrar Pool Enterprise Voice Line URI

It’s basically a list you can hand to your customers and colleagues so they can keep track of changes.
Additionally, it helps spot Enterprise Voice enabled users that don’t have a Line URI or it’s misconfigured.

When you run the script it’ll ask your for your Credentials – You must Have appropriate Lync permissions:

Credentials

It will then ask you for the FQDN of your Lync server or pool and will attempt to connect:

Lync Server

When connected, the script will immediately start creating the Excel file:

Creating Excel2

You can scroll up and down the Excel file but do not click anywhere on the spreadsheet. This causes the automated build to crash, and you’ll have to restart the script.

When completed, the script will notify you and close the remote PowerShell session it initiated.

Script Done

The pace is approx. a second per line, so if you have 5000 users this is the time to go and grab a cup of coffee.

The script can be downloaded here.

Updated October 7, 2014: Version 2.0 checks for your PS version. This script will only run on PS 3.0 or higher.

Polycom VVX FTP Provisioning Server Creation Script

Originally posted: August 29, 2014.
Updated: February 15, 2017..

I was following Polycom’s instructions and Jeff Schertz’s post on configuring an FTP Provisioning server for the Polycom VVX range. In large deployments, when you need to update and configure hundreds and thousands of phones, this is the only way to do it right.

There were two things that I struggled with when configuring this server:

  • You have to build and configure an FTP server, DHCP options, AD user, download the files… etc.
  • For most organizations – You’ll use an FTP on a Windows server. Jeff mentioned that the username and password for the FTP user (PlcmSpIp) would not be acceptable in many environments due to the fact that it doesn’t meet the Password complexity requirements.

So, I set up my mind to create an automated process to do all of the above, in a Windows Active Directory environment. I wanted to run a task on the soon-to-be FTP server that will save me all the hassle of configuring three different serves and downloading the software. Well, guess what – it worked!

So what is this script doing?

  1. It will first check if you have local Admin rights to run the script. Automatic elevation will take place if you allow it.
  2. It will warn you, very clearly, that you’re about to install an FTP server on this machine and create a new, granular, non-secure password policy. It will also advise that the latest Polycom firmware is downloaded from my site, and not the Polycom website (You need to accept terms and conditions there, there’s no direct download link).
  3. You’ll be prompted to enter the server’s FQDN, although you’re actually installing it on that server. We’ll use that later…
  4. It will check your Forest and Domain functional levels. This script requires that your domain functional level would be at least Windows 2008.
  5.  It will install the following features and prerequisites:
    • IIS FTP
    • IIS Management Tools
    • DHCP Remote Server Administration Tools
    • ADDS Remote Server Administration Tools (Installed previously on Domain Functional Level tests)
  6. It will then install and configure a new FTP site in a dedicated VVX folder under C:\Inetpub. The FTP server will be configured to use Basic Authentication only and will authorize the user PlcmSpIp with read and write permissions. As suggested in Jeff’s post, dedicated ‘logs’ and ‘calls’ folders are created as well.FTP Creation
  7. It will then download the (currently) latest VVX firmware from my website. This normally takes 2-3 minutes, but can take longer depending on your Internet connection. If you have a proxy – it might not allow the download.
  8. Upon successful download of the file – the files will be unzipped to the VVX folder of the FTP and the original ZIP file will be deleted.
  9.  The script will then ask you for your DHCP server’s FQDN, it will add DHCP option 160 and configure options 160 and 066.
  10. The server will then confirm that you have options 4 and 42 configured and will ask you to provide a time server IP if these options are not yet there.
  11. A new Active Directory Fine-Grained Password Policy named PlcmSpIpPSO that does not require Password Complexity.
  12. Wait for AD for 30 seconds – this has proven to be a critical pause…
  13. Create a new AD user named PlcmSpIp in the default User container with the description: “User for Polycom Provisioning Server – This user has a simple password policy”. You can move this user to a different location once the script is finished.
  14. Apply the new Fine-Grained Password Policy to this user.
  15. Enable the user, set its password to PlcmSpIp and set it to “Never Expires”.

That’s it, your server is good to go.

FTP Ready

Many thanks to Guy Bachar for his help in this one.

Updates:

September 3, 2014, Version 2.3.1:
– Domain and Forest Functional Level tests in beginning of script.
– No need to insert the FTP server’s name.
– DHCP test errors are no longer visible.

September 5, 2014, Version 2.4.0:
– Updated to Polycom VVX Software version 5.1.2

February 15, 2017, Version 3.0.0:
– Now downloading version 5.5.1 directly from Polycom.
– Added configuration for DHCP option 161.


Download the script here.


Lync 2013 and Fax machines over SIP trunk

Welcome to the world of the unknown.

There are many factors in this equation, and each one has its own influence on the final result. I found out what works for most of my implementations, using the following configurations:

  • I use a direct SIP trunk to an ITSP – walking through firewalls and dedicated routes, but no gateways along the way. I found that converting traffic from analogue to digital to analogue is usually a guarantee to break the connection.
  • My ITSP is NOT Microsoft certified. I can use either TLS or TCP SIP, as long as it works.
  • For any analogue device you’re going to connect to Lync, you’ll need an analogue translation and port. an ATA (Analogue Telephone Adapter) is a small box that knows how to do just that. I usually use AudioCodes MP series ATAs.
  • If I do use a gateway to the PSTN, I’d prefer taking all fax calls and redirect them to FXS ports on the gateway before they arrive to the Lync Mediation server. This way it stays analogue all the way. . I’d strongly recommend having these ports on your gateway as there’s always a use for an extra analogue interface. Trust me.

So Basically, in an ideal Lync implementation, you’ll have the following:

Diagram

So by now you probably have all of the above, just need to make sure it works. As soon as you have the ATA configured as an additional PSTN gateway, you can go ahead and add the analogue device.

First let’s start with adding the fax as an analogue device:

New-CsAnalogDevice -LineUri tel:+35315556789 -DisplayName "Your Fax Description" -RegistrarPool LyncFE.domain.local -AnalogFax $False -Gateway <Gateway IP or FQDN> -OU "OU=LyncDevices,DC=domain,dc=local"

Now you’re not wrong: It says -AnalogFax $False for a reason. I followed James Cussen’s interesting and very detailed post on connecting fax to Lync, and tested all options until I figured out which one works for me.

Next thing would be to configure your AudioCodes ATA. Assuming you’re comfortable with configuring its IP and DNS settings, I’ll only go through the settings relevant for the fax to work:

Configure Lync as your ATA’s next hop. Go to VoIP-> SIP Definitions-> Proxy &Registration and Choose “Use Default Proxy” and click the small arrow beneath it to enter your Mediation server’s details:

Use default Proxy

Then enter your Mediation server’s FQDN and choose TCP for protocol:

Set Proxy

For fax to go through I configure all fax coding to use G.711:

Go to VoIP-> Media-> Fax/Modem/CID Settings and configure Fax Transport Mode to ByPassEnable.
I usually disable all the other settings as a precaution, but you don’t have to do that. Set your Coder type to Alaw or Ulaw, based on your location:

Fax Settings

Next, go to VoIP-> Coders And Profiles -> Coders and set your coder to Alaw or Ulaw based on your location:

Coder profiles

On the same pane, scroll a little down to Tel Profile Settings and configure the Fax signalling Method to G.711:

Fax Signaling Method

And one more on the same pane, go to IP Profile Settings and configure Fax signalling Method to G.711:

Fax Signaling Method2

Now, configure your fax number for the ATA port you’re going to connect it to. On the following screenshot, I configured port 1 to use the number +35315556789. Remember to use the exact same number you used when ran the New-CsAnalogDevice command, as this is the exact number tat will be sent to the ATA. If the number is different – the ATA will reply with “Number can’t be found”. This is done at VoIP-> Hunt Group-> EndPoint Phone Number:

Endpoint phone number

Next, to allow outgoing faxes through Lync, we’ll need to configure where analogue traffic is going to. Go to VoIP-> Routing-> Tel to IP Routing and configure the IP and port of your Mediation server:

Tel to IP Routing

That’s about it. Fax should be going in and out.

***
AudioCodes uses an INI file to save the configuration of your ATA. Alternatively, you can upload a file with most of the configurations already done for you and only change the relevant settings.
I created an INI file with all the above configurations, all you’ll have to do is change the IP addresses and names and you can upload it to your ATA to only configure the Endpoint numbers.

Open the INI file with a text editor and search for anything that start with <Change Here = >. Replace the existing values with your values and reboot the ATA.

You can download the file here.


Script to add 2014 Irish holidays to Lync Server 2010 or 2013

Had a couple of requests this past week to set holidays for Response Groups.
I used Jamie Schwinn‘s great Lync RGS Holiday Set Editor for the first and second customer, but it started getting a little frustrating when I thought I’m going to have to do this for more customers as time goes by.

So for all of you Irish lads using Lync, here’s a script to add all the 2014 Irish holidays to Lync, with a single click.

Import this tool to your Lync server and run it using Lync management shell:

Lync Holidays Script 1

The script will ask you for your RGS’ DB server’s FQDN. Enter the name and hit Enter.

The script will complete in a second, creating all holidays for the year 2014:

Lync Holidays Script 2

You can run Get-CsRgsHolidaySet to verify the settings or use Jamie’s tool to have a better look at it:

Holidays confirmed

That’s it, you even have 2015 New Year’s Day as a bonus, so you can worry about running the 2015 script around February…

* Note – This script is designed to work on EN-US Locale, as this is the default Lync Management shell locale. If you’re working with the EN-IE locale, you’ll have to switch to EN-US for this script to run ok.

Download the script here.

Download: Microsoft Lync Server 2013 Multitenant Hosting Pack Deployment Guide

Microsoft has Announced the Release of Lync Server 2013 Multitenant Hosting Pack Deployment Guide.
The Lync Server 2013 Multitenant Hosting Pack enables service providers to sell value-added, Lync-based solutions to small and midsized customers. The hosting pack topology, based on Lync Online, enables partners to offer a more cost-effective topology to manage a large number of tenants with fewer users, which makes the offering compelling to small-to-midsized customers.

What’s Available in the Lync Server 2013 Multitenant Hosting Pack?

The features that integrate with other components and applications include the following:

  • Presence   A collection of attributes that provides an indication of a person’s status, activity, location, willingness to communicate, and contact information.
  • Instant messaging (IM)   A form of real-time text-based communication.
  • Data and desktop sharing   A feature that allows users to share files, use whiteboard, and display their desktop to a meeting or to conversation participants.
  • Conferencing   Two-way video and audio transmissions between users in multiple locations.
  • Unified Messaging   This feature is available only in combination with Microsoft Exchange Server. An application that consolidates a user’s voice mail, fax, and email into one mailbox, so that the user only needs to check a single location for messages, regardless of type. The email server is the platform for all types of messages, making it unnecessary to maintain separate voice mail and email infrastructures.
  • Private branch exchange (PBX) replacement   UC integration with Voice over Internet Protocol (VoIP) systems can replace traditional phone exchange systems.

Lync Server Multitenant Hosting Pack partner feature set includes:

  • Appliances   Hand and head set I/O devices.
  • Conferencing server gateway video   Real-time IP video, voice, and data services.
  • Audio conferencing provider   Integration with hosted conferencing systems.
  • Short Message Service (SMS)   Text messaging systems used by phones and mobile communication systems.


Lync Server 2013 WAC (Office Web Apps Server) – Part 2: Publishing

In part 1 of this post, we learned how to install and configure the Lync Server 2013 WAC Server.

In this part, we’ll publish it to enable external users access to our conference resources.

Add External Access url:

In part 1, we used the following command:

New-OfficeWebAppsFarm -InternalURL “https://LyncWAC.YourDomain.Local” –CertificateName “My WAC Server”

For external access, use the same command, but add -ExternalURL “<WAC server external DQDN>”. So if you want to run is together, the command would be:

New-OfficeWebAppsFarm -InternalURL “https://LyncWAC.YourDomain.Local” -ExternalURL "https://WACsrv.domain.com" –CertificateName “My WAC Server”

That’s all the configuration needed on the Lync side.

Next step is to configure a publishing rule in TMG 2010. Unfortunately, you cannot use your External web url, since Lync traffic is bridged to port TCP 4443, and Office Web Apps Server works HTTPS, meaning TCP 443.#

Update:

Since TMG is end of life, You can now use IIS ARR to publish Lync Server 2013.

Refer to this post if you want to use IIS ARR.

Publish your server with Forefront TMG 2010:

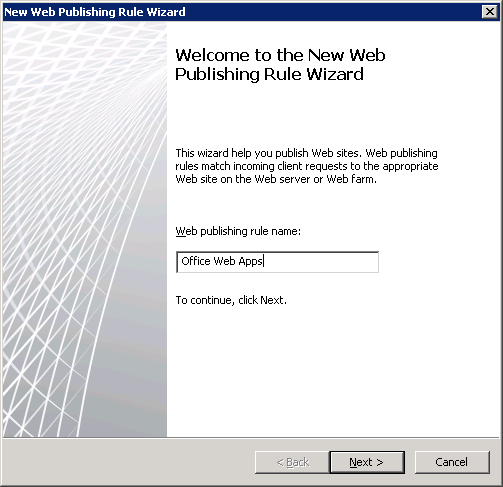
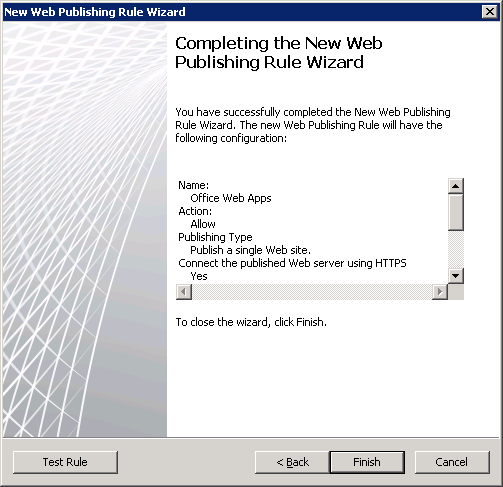
Form your TMG cosnsole, select “New Web Publishing Rule”. Give your rule a name and click “Next”:

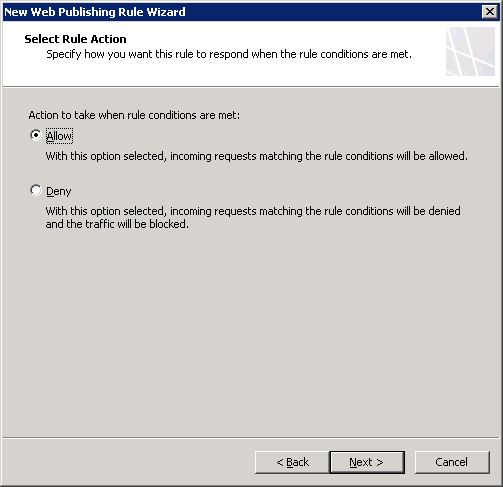
In the “select Rule Action window, choose “Allow” and click next:

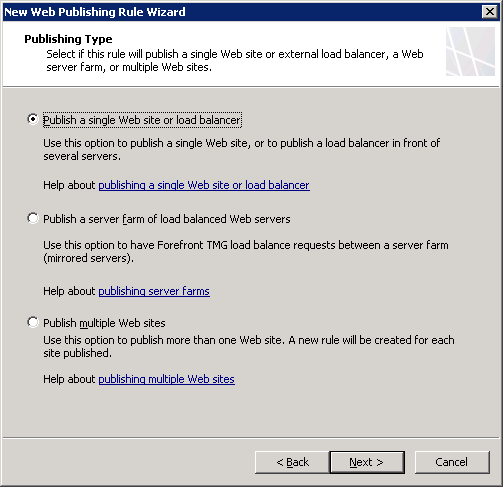
In the “Publishing Type” windows choose “Publish a single Web site or load balancer”:

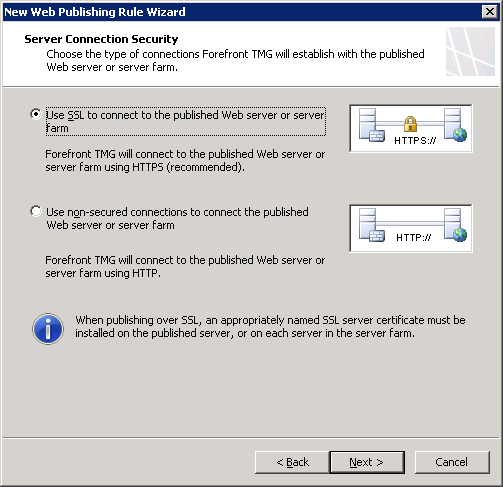
Then choose “Use SSL”:

In the next window, enter you Internal site name – That’s the one entered earlier in the command. If your TMG cannot resolve this name to an IP, you might enter it it in the field below:

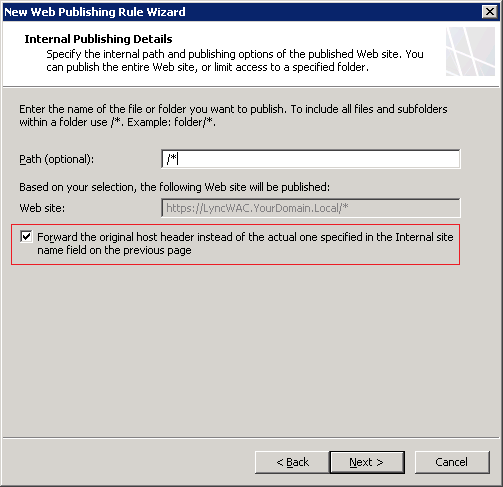
In the Internal Publishing Details window, Enter /* in the path field, and remember to check the “Forward the original host header…” checkbox:

In “Public Name Details” enter the external FQDN of your WAC server. This is the name you entered earlier in the -ExternalURL command:

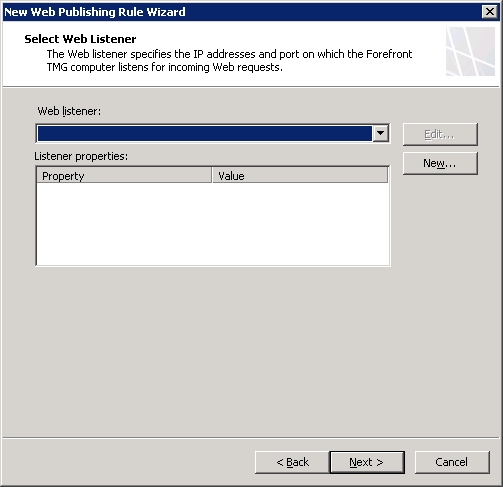
In the “Select Web Listener” window select “New”:

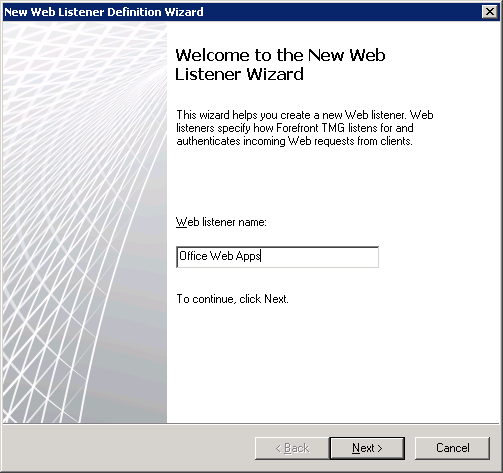
Name your listener and click next:

Choose “Require SSL” in the Client Connection Security window:

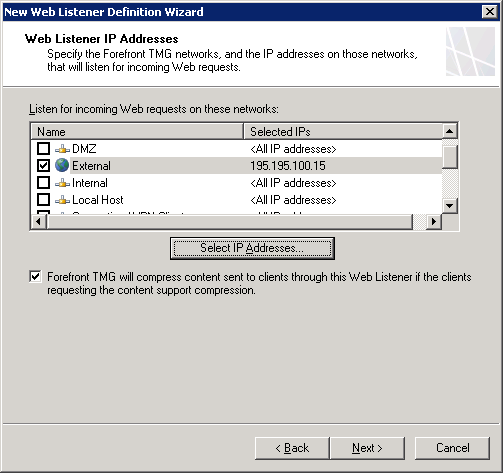
Choose your listener IP:

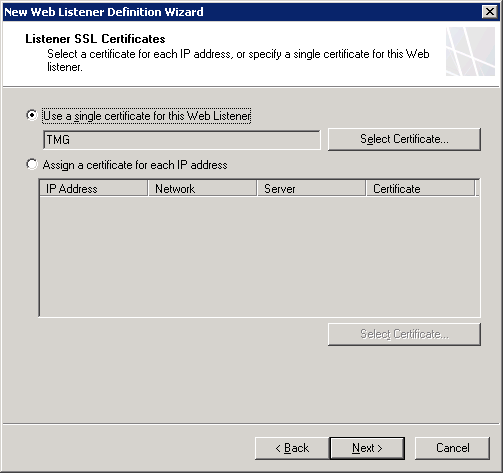
Choose your listener’s certificate:

(Must contain you external FQDN)

In the “Authentication Settings” window select “No Authentication”:

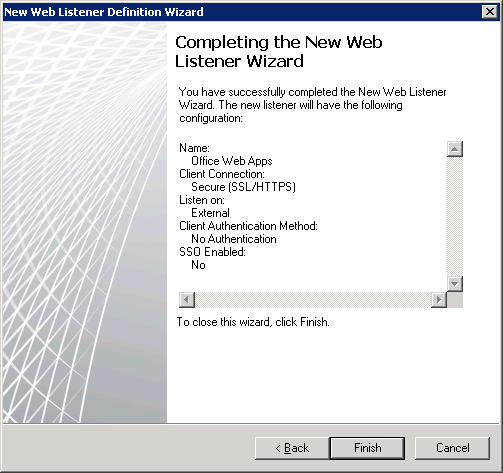
Click “Next” on the SSO settings page, review your listener’s settings and click Finish:

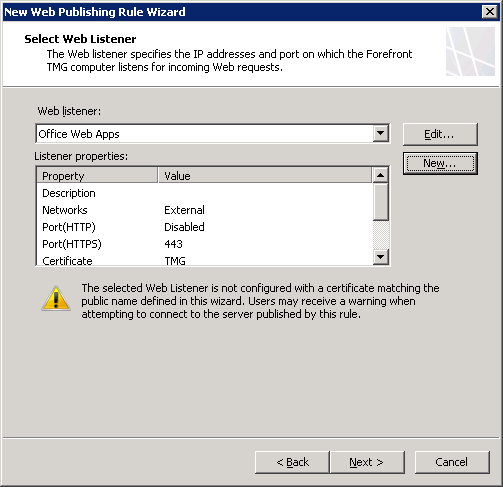
The new listener is now selected for your rule:

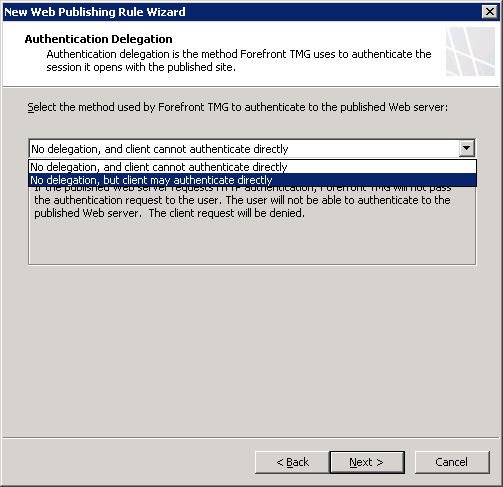
In the next window, choose “No delegation, but client may authenticate directly”:

Leave the user sets with “All Users”:

In the last window, review your settings and click Finish:

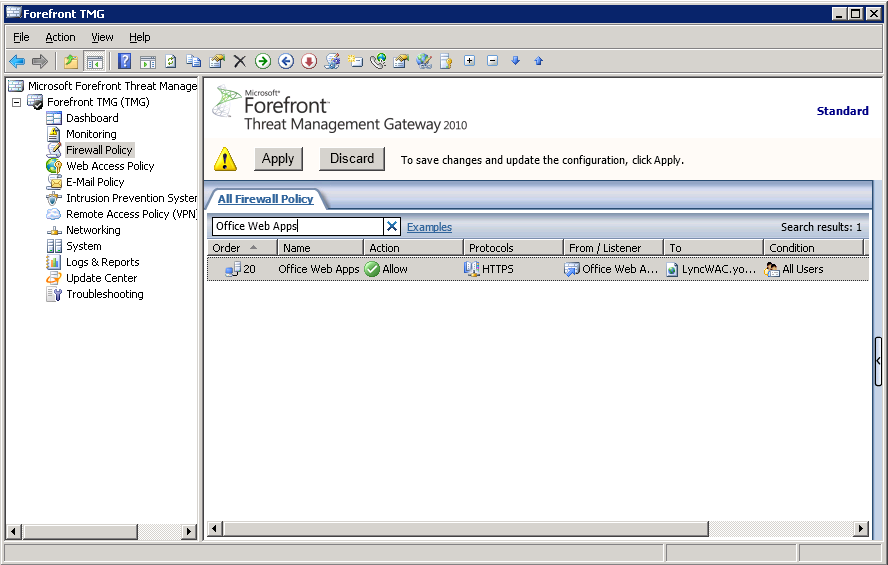
Locate your rule in the TMG console and right click to edit it:

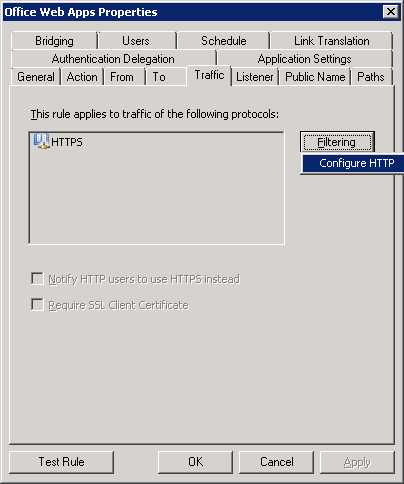
Navigate to the “Traffic” tab, click “Filtering” and “Configure HTTP”:

Uncheck the “Verify normalization” box and click OK:

Verify_Normalization

Apply the changes to your Forefront TMG 2010 Server.

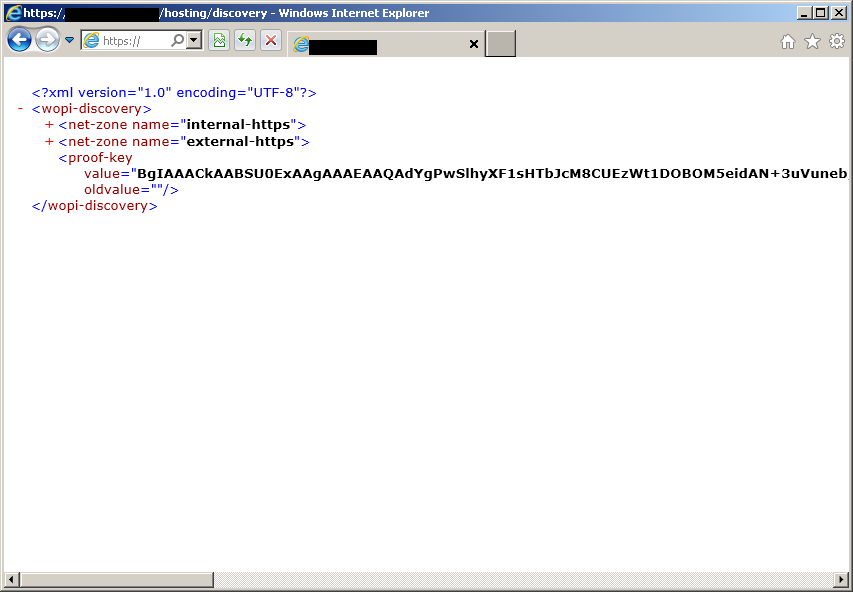
To test your WAC publishing, open a web browser and type: https://<ExternalFQDN.Domain.Com/hosting/discovery

You should get a XML output similat to this:

<?xml version="1.0" encoding="UTF-8"?>
-<wopi-discovery>-<net-zone name="internal-https">-<app name="Excel" checkLicense="true" favIconUrl="https://lyncwac.mydomain.local/x/_layouts/images/FavIcon_Excel.ico"><action name="view" urlsrc="https://lyncwac.mydomain.local/x/_layouts/xlviewerinternal.aspx?<ui=UI_LLCC&><rs=DC_LLCC&>" default="true" ext="ods"/><action name="view" urlsrc="https://lyncwac.mydomain.local/x/_layouts/xlviewerinternal.aspx?<ui=UI_LLCC&><rs=DC_LLCC&>" default="true" ext="xls"/><action name="view" urlsrc="https://lyncwac.mydomain.local/x/_layouts/xlviewerinternal.aspx?<ui=UI_LLCC&><rs=DC_LLCC&>" default="true" ext="xlsb"/><action name="view" urlsrc="https://lyncwac.mydomain.local/x/_layouts/xlviewerinternal.aspx?<ui=UI_LLCC&><rs=DC_LLCC&>" default="true" ext="xlsm"/><action name="view" urlsrc="https://lyncwac.mydomain.local/x/_layouts/xlviewerinternal.aspx?<ui=UI_LLCC&><rs=DC_LLCC&>" default="true" ext="xlsx"/><action name="edit" urlsrc="https://lyncwac.mydomain.local/x/_layouts/xlviewerinternal.aspx?edit=1&<ui=UI_LLCC&><rs=DC_LLCC&>" ext="ods" requires="update"/><action name="edit" urlsrc="https://lyncwac.mydomain.local/x/_layouts/xlviewerinternal.aspx?edit=1&<ui=UI_LLCC&><rs=DC_LLCC&>" ext="xlsb" requires="update"/><action name="edit" urlsrc="https://lyncwac.mydomain.local/x/_layouts/xlviewerinternal.aspx?edit=1&<ui=UI_LLCC&><rs=DC_LLCC&>" ext="xlsm" requires="update"/><action name="edit" urlsrc="https://lyncwac.mydomain.local/x/_layouts/xlviewerinternal.aspx?edit=1&<ui=UI_LLCC&><rs=DC_LLCC&>" ext="xlsx" requires="update"/><action name="editnew" urlsrc="https://lyncwac.mydomain.local/x/_layouts/xlviewerinternal.aspx?edit=1&<ui=UI_LLCC&><rs=DC_LLCC&>" ext="xlsx" requires="update"/><action name="interactivepreview" urlsrc="https://lyncwac.mydomain.local/x/_layouts/xlpreview.aspx?<ui=UI_LLCC&><rs=DC_LLCC&>" default="true" ext="xlsb"/><action name="interactivepreview" urlsrc="https://lyncwac.mydomain.local/x/_layouts/xlpreview.aspx?<ui=UI_LLCC&><rs=DC_LLCC&>" default="true" ext="xlsm"/><action name="interactivepreview" urlsrc="https://lyncwac.mydomain.local/x/_layouts/xlpreview.aspx?<ui=UI_LLCC&><rs=DC_LLCC&>" default="true" ext="xlsx"/><action name="mobileView" urlsrc="https://lyncwac.mydomain.local/x/_layouts/xlviewerinternal.aspx?<ui=UI_LLCC&><rs=DC_LLCC&>" ext="xls"/><action name="mobileView" urlsrc="https://lyncwac.mydomain.local/x/_layouts/xlviewerinternal.aspx?<ui=UI_LLCC&><rs=DC_LLCC&>" ext="xlsb"/><action name="mobileView" urlsrc="https://lyncwac.mydomain.local/x/_layouts/xlviewerinternal.aspx?<ui=UI_LLCC&><rs=DC_LLCC&>" ext="xlsm"/><action name="mobileView" urlsrc="https://lyncwac.mydomain.local/x/_layouts/xlviewerinternal.aspx?<ui=UI_LLCC&><rs=DC_LLCC&>" ext="xlsx"/><action name="embedview" urlsrc="https://lyncwac.mydomain.local/x/_layouts/xlembed.aspx?<ui=UI_LLCC&><rs=DC_LLCC&>" ext="xlsb"/><action name="embedview" urlsrc="https://lyncwac.mydomain.local/x/_layouts/xlembed.aspx?<ui=UI_LLCC&><rs=DC_LLCC&>" ext="xlsm"/><action name="embedview" urlsrc="https://lyncwac.mydomain.local/x/_layouts/xlembed.aspx?<ui=UI_LLCC&><rs=DC_LLCC&>" ext="xlsx"/><action name="formsubmit" urlsrc="https://lyncwac.mydomain.local/x/_layouts/xlform.aspx?<ui=UI_LLCC&><rs=DC_LLCC&>" ext="xlsb"/><action name="formsubmit" urlsrc="https://lyncwac.mydomain.local/x/_layouts/xlform.aspx?<ui=UI_LLCC&><rs=DC_LLCC&>" ext="xlsm"/><action name="formsubmit" urlsrc="https://lyncwac.mydomain.local/x/_layouts/xlform.aspx?<ui=UI_LLCC&><rs=DC_LLCC&>"

Note you will have two “net zones”: “internal-https” and “external-https”, each with the following applications offered:

  • Excel
  • OneNote
  • PowerPoint
  • Word

Your Lync 2013 WAC Server is ready.

Lync Server 2013 and Skype for Business Server 2015 – WAC (Office Web Apps Server) – Part 1: Installing and configuring

27.03.2013: Updated to the latest version of Office Web Apps Server.

Lync Server 2013 WAC is a new requirement in the Lync Server 2013 deployment. You’ll have to have this server is you want to be able to share PowerPoint presentations.

The installation and configuration of this server is quite easy,  let’s take a look:

Prerequisites:

First, download the Microsoft Office Web Apps Server from here and the update from here. While it downloads, we can configure the other prerequisites.

If you’re using Windows Server 2008R2, please download Microsoft’s .Net Framework 4.5, download Windows Management Framework 3.0, and download KB2592525, which will allow you to run the applications in a Server 2008R2 environment.

Install all of the above, Then, run this using an elevated PowerShell:

Import-Module ServerManager
Add-WindowsFeature Web-Server,Web-WebServer,Web-Common-Http,Web-Static-Content,Web-App-Dev,Web-Asp-Net,Web-Net-Ext,Web-ISAPI-Ext,Web-ISAPI-Filter,Web-Includes,Web-Security,Web-Windows-Auth,Web-Filtering,Web-Stat-Compression,Web-Dyn-Compression,Web-Mgmt-Console,Ink-Handwriting,IH-Ink-Support

Restart the server if you’re prompted to do so.

If you’re using Windows Server 2012, it’s even easier; Just run the following from an elevated  PowerShell (Server 2012 imports the relevant PS modules automatically, so you don’t have to use the “Import-Module” command) :

Add-WindowsFeature Web-Server,Web-Mgmt-Tools,Web-Mgmt-Console,Web-WebServer,Web-Common-Http,Web-Default-Doc,Web-Static-Content,Web-Performance,Web-Stat-Compression,Web-Dyn-Compression,Web-Security,Web-Filtering,Web-Windows-Auth,Web-App-Dev,Web-Net-Ext45,Web-Asp-Net45,Web-ISAPI-Ext,Web-ISAPI-Filter,Web-Includes,InkandHandwritingServices

Restart the server if you’re prompted to do so.

Install the Microsoft Office Web Apps Server:

For Server 2012, double-click the .img file and run “Setup.exe”.

For Server 2008R2, open the .img file with any software of your choice and run “Setup.exe”

Restart the server if you’re prompted to do so and install the update.

Create a certificate:

Like most Lync services, you’re required to assign a certificate to this service as well.

We’ll use the IIS Manager to do that:

Launch the IIS Manager and scroll down to “Server Certificates”:

In the “Server Certificates” window, click on “Create Domain Certificate” in the Action pane:

In the “Create Certificate” window, fill the details of your server and organization. Note that the “Common Name” must be in the “Server.Domain.Local” format:

In the next window, choose you CA, and give your certificate a friendly display name – We’ll use that name later:

When you click “Finish”, you’ll see you have a new certificate:

Configure the WAC Server:

From an elevated PowerShell, run the following command:

New-OfficeWebAppsFarm -InternalURL “https://LyncWAC.YourDomain.Local” –CertificateName “My WAC Server”

In -CertifiacteName, enter the friendly name you gave your certificate earlier.

The result should look like this:

To check that, open a web browser and go to https://LyncWAC.YourDomain.Local/hosting/discovery, you should get this result:

If you get an error, try fixing your .Net Framework 3.5 components with this command:

%systemroot%\Microsoft.NET\Framework64\v4.0.30319\aspnet_regiis.exe -iru,

Then, run iisreset /restart /noforce.

Your WAC Server is ready!

Add the Server to Lync Topology:

Open the Lync Server Topology Builder, expand “Shared Components”,right click “Office Web Apps Servers”, and choose “New Office Web Apps Server…”:

In the new window, type your server’s FQDN. the wizard will fill-in the discovery address:

Press OK, and the server is in your topology:

Associate your  Front-End pools with your Office Web Apps Server, publish the topology, and you’re done!

See how to publish your WAC server in Part 2 of this post